Securing a Web3 staking node (whether for Ethereum, Cosmos, Solana, or any other Proof-of-Stake chain) is a distinct engineering challenge. Unlike a standard web server where you want to absorb or block basic HTTP noise, a validator node requires consistent, high-throughput peer-to-peer (P2P) communication while protecting its signing keys and RPC interfaces.
If your edge defense misbehaves, your node gets dropped from the network, causing missed blocks, lost rewards, or worse—slashing due to down-time or forced double-signing.
1. The Anatomy of a Staking Node Attack Surface
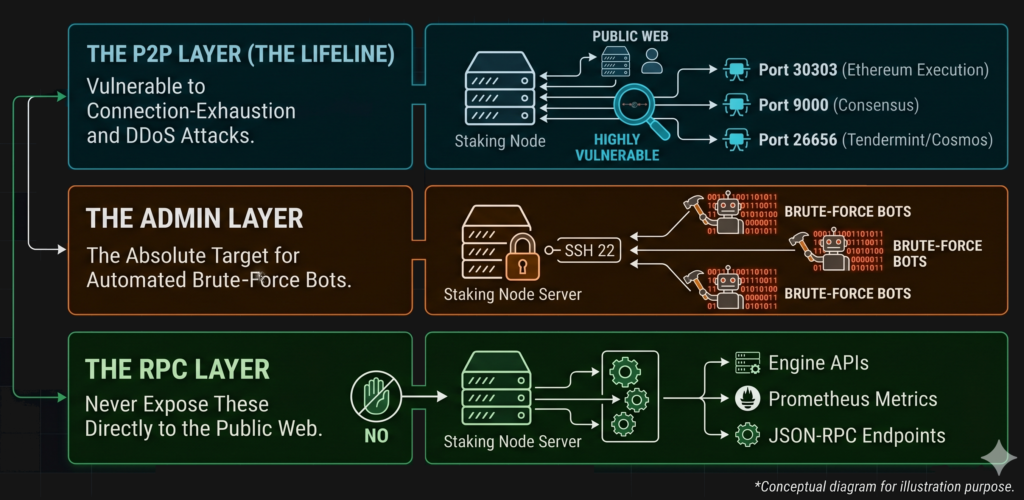
- The P2P Layer (The Lifeline): Ports like
30303(Ethereum execution),9000(Consensus), or26656(Tendermint/Cosmos). These must talk to the public web, leaving them highly vulnerable to connection-exhaustion and DDoS attacks.
- The Admin Layer: SSH (
22). The absolute target for automated brute-force bots.
- The RPC Layer: Engine APIs, Prometheus metrics, and JSON-RPC endpoints. Never expose these directly to the public web.
2. Hardening UFW (Uncomplicated Firewall)
Step-by-Step Configuration
1. Establish Baseline Drop Policy
Prerequisite
Block all incoming traffic by default and permit necessary outgoing state tracking.
sudo ufw default deny incoming
sudo ufw default allow outgoing2. Secure Administrative Access (SSH)
Crucial Execution
Never leave SSH completely open. If you have a static IP or an internal WireGuard VPN subnet (e.g., 10.8.0.0/24), tie port 22 directly to it.
# Replace with your secure management subnet or specific IP
sudo ufw allow from 10.8.0.0/24 to any port 22 proto tcp comment 'WireGuard SSH Access'If you absolute must use public SSH, use UFW’s built-in rate-limiting container:
sudo ufw limit 22/tcp comment 'Rate-limit Public SSH'3. Expose the P2P Protocols
Chain-Specific
Open the specific P2P ports your validator client needs to find peers.
# Example: Ethereum Execution (30303) and Consensus (9000)
sudo ufw allow 30303/tcp comment 'Execution P2P TCP'
sudo ufw allow 30303/udp comment 'Execution P2P UDP'
sudo ufw allow 9000/tcp comment 'Consensus P2P TCP'
sudo ufw allow 9000/udp comment 'Consensus P2P UDP'4. Activate the Edge Shield
Final Step
Verify your rules and fire up the engine.
sudo ufw status numbered
sudo ufw enablePro-Tip: Advanced IP Tables Tuning for SYN Floods
Staking nodes process massive connection tables. Edit /etc/ufw/sysctl.conf to add kernel-level tracking optimizations against denial-of-service attempts:
# Append to /etc/ufw/sysctl.conf
net.ipv4.tcp_syncookies=1
net.ipv4.tcp_tw_reuse=1
net.ipv4.tcp_max_syn_backlog=4096
net.ipv4.tcp_fin_timeout=153. Weaponizing Fail2ban for Node Telemetry
While UFW blocks traffic statically, Fail2ban reads system logs dynamically and injects temporary or permanent drops into UFW whenever anomalous behavior occurs.
Instead of standard settings that drop an IP for 10 minutes, malicious actors targeting Web3 systems require an aggressive operational posture: Longer evaluation horizons, zero tolerance, and full-stack port isolation.
Custom Configuration (/etc/fail2ban/jail.d/staking.local)
Create a local configuration to override defaults. Notice we explicitly switch the execution framework (banaction) to target ufw globally, rather than fallback iptables hooks.
[DEFAULT]
# If an IP triggers a jail, block them from ALL ports via UFW
banaction = ufw
banaction_allports = ufw

# Aggressive Staking Node Ban Metrics
bantime  = 3d          # Ban malicious actors for 3 days
findtime = 1h          # Track behavior windows over 1 hour
maxretry = 3           # 3 strikes and you are out

# NEVER ban local loopbacks or your internal management subnet
ignoreip = 127.0.0.1/8 ::1 10.8.0.0/24

[sshd]
enabled = true
port    = 22
logpath = %(sshd_log)s
backend = systemdBuilding a Custom P2P Abuse Filter
Many validator clients (like Lighthouse, Geth, or Prysm) dump logs when peer connections repeatedly spam malformed handshakes or dead RPC queries. We can write a custom regex pattern to intercept this.
1. Create the filter layout: /etc/fail2ban/filter.d/node-abuse.conf
[Definition]
failregex = ^.*Peer <ADDR> disconnected: Malformed message.*$
            ^.*P2P stream error from <ADDR>:.*$
ignoreregex =2. Activate the Custom Validator Jail: Append this inside
/etc/fail2ban/jail.d/staking.local
[node-abuse]
enabled  = true
port     = 30303,9000
filter   = node-abuse
logpath  = /var/log/validator/client.log
maxretry = 5
action = ufw[name=NodeAbuse, port="30303,9000", protocol=tcp]Run sudo systemctl restart fail2ban to spin up your new defense layers.
4. Auditing Your Edge Defenses
Once configured, verify that your defenses are operational and actively parsing traffic telemetry:
| Command | Objective | Expected Output Target |
sudo ufw status verbose | Audits open attack surface | Default: deny (incoming) |
sudo fail2ban-client status | Confirms active jail systems | Jail list: sshd, node-abuse |
sudo fail2ban-client status sshd | Verifies real-time banned IPs | Displays matrix of currently blocked hosts |
Operational Warning: Staking node telemetry engines (like Prometheus/Grafana) should be accessed strictly via SSH local port forwarding (ssh -L 3000:localhost:3000 user@node-ip) or hosted behind a strictly authenticated internal wireguard mesh network. Exposing metric endpoints to the open web reveals client types, block heights, and operating characteristics that aid targeted zero-day exploits.
⚡ SLA-Backed Edge Infrastructure for Valdiators
Software-level firewalls are your last line of defense, but heavy network flooding can still saturate your local network interface. Protect your staking architectures from costly downtime and slashing penalties with enterprise-grade physical edge defense.
👉 View Our Live Unmanaged Server Inventory to deploy dedicated hardware protected by automated inline DDoS mitigation, massive port capacities, and premium network routing.